Thursday, January 23, 2014

The Alden Street House Remodel

The Alden Street House Remodel November 2013
Contact:


Redline Construction was hired as the General Contractor on this House Remodel Project. In three short weeks we gutted the entire house and rebuilt/remodeled.

The outside of the house was repainted and guard railing was added to the front porch. Overgrown shrubs and bushes were removed and cut back away from the home. A large tree was also removed from the front of the home. The detached garage was cleaned out and given a fresh coat to match the house. A brand new garage door was also added.

Alden Street Home Remodel (1) Alden Street Home Remodel (22)Alden Street Home Remodel (23) Alden Street Home Remodel (144)Alden Street Home Remodel (51) Alden Street Home Remodel (98)Alden Street Home Remodel (188)

The kitchen was completely gutted and new electrical, plumbing and sheetrock was installed. New marble tile, maple cabinets and granite counter tops were also installed.

Alden Street Home Remodel (6) Alden Street Home Remodel (67) Alden Street Home Remodel (90) Alden Street Home Remodel (126)1389973245622__kwipfn10_10_

The dining room was updated with fresh paint, new headers, repaired plaster, new baseboards, updated granite window seals, marble tile and repainted corner cabinets.

Alden Street Home Remodel (5) Alden Street Home Remodel (66)Alden Street Home Remodel (89) Alden Street Home Remodel (120)Alden Street Home Remodel (160)

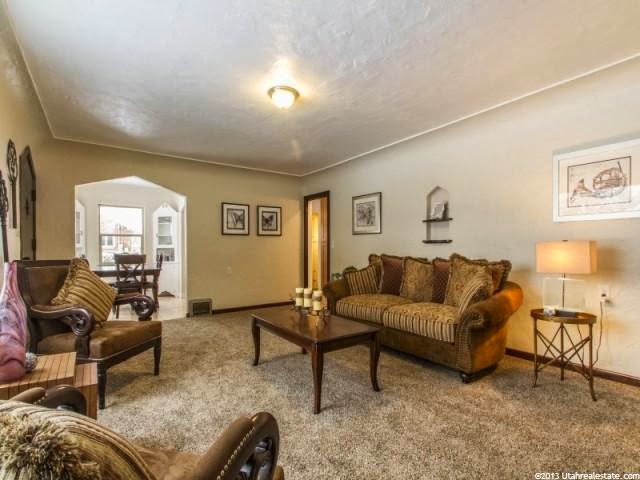
The front room was given a new coat of paint and the baseboards were re-stained. The front door was sanded down and re-stained and marble tile was installed in the entry way. Brand new carpet was installed. We tried to keep the charm of 1924 and left the fireplace and old shelving in tact.

Alden Street Home Remodel (3) Alden Street Home Remodel (65)

All bathrooms were updated with new marble tile, granite counters, maple cabinets and all new fixtures.

Alden Street Home Remodel (8) Alden Street Home Remodel (86)Alden Street Home Remodel (167)

The master bedroom was updated with new paint and baseboards and the wooden floors were sanded down and refinished. The ironing board closet was re-stained and left to keep some charm of the old house.

Alden Street Home Remodel (164) 1389973245798__kwipfn14_14_

The upstairs bedrooms were given a fresh coat of paint, new baseboards and brand new carpet.

1389973246066__kwipfn21_21_ 1389973246129__kwipfn23_23_

A new laundry room was plumbed in and all new fixtures were installed. Marble tile floors were also added.

Alden Street Home Remodel (71) Alden Street Home Remodel (174)

The basement mother-in-law was updated with sheetrock repairs and then a fresh coat of paint. All carpets in the basement were professionally cleaned. Update cabinets and counter tops were installed in the kitchen.

Alden Street Home Remodel (20) 1389973245686__kwipfn12_12_

The entire home was rewired with new electrical wires and brought up to code. Room heaters, new outlet covers, switch plates, light fixtures and vent covers were installed in where needed.

Alden Street Home Remodel (135) Alden Street Home Remodel (74)

This project was completed on time and within budget.

Wednesday, January 22, 2014

ABRA Auto Body and Glass Bathroom Remodel


ABRA Auto Body and Glass Bathroom Remodel
Contact Info:

There was extensive water damage in the bathroom area at this auto body shop and the bathroom as in desperate need of updating. The back area was a simple chain link fence so Redline added onto the back of the building. Redline framed the building, sheathed it with exterior plywood, added a moisture barrier wrapping and installed vinyl siding.

For the bathroom area Redline removed all the existing fixtures and repaired the drywall. We installed diamond wainscoting on the walls to tie into the auto body shop and provide protections against moisture and wear and tear. Toilets, urinals and privacy stalls were also installed, along with sinks and vent fans.

Tuesday, January 14, 2014

Heber Valley DMV Awning

P1100803
Heber Valley DMV Awning
Contact:

This area receives a lot of snow, so the NorthWest corner of the building, where the employee entrance/exit is; is frequently snowed in throughout the winter, or covered in ice. PGAW Architects commissioned us to build an awning over this area, with a sidewalk to the parking lot, built to match the existing awnings over the front doors (used by customers); to enable the staff to use the entrance year-round. We first excavated the area, moved the sprinklers in the area so they would not be under the sidewalk, tied rebar into the existing building and curbing to the parking lot, laid out a metal mesh (this reinforces the concrete and the rebar ties it into the existing work, so it will not separate with the freeze/thaw cycle) dug two 18” wide x 3’ deep holes for sono tubes, which we then installed rebar in a ring and lattice pattern (to create a footing for the massive log posts/columns that would support the entire roof structure), and poured the concrete for the sidewalk and post footings. We set custom brackets in the footings while the cement was soft, to allow us to anchor the columns to the footings. Once the concrete had cured for a week, we returned with large timber beams and columns to frame the structure. We began by cutting the columns to height (the sidewalk slopes downhill to allow for proper drainage, but the roof and beams need to be level, so the 2 columns are different heights), and shaping the top of the columns to accommodate the 6” x 16” rough hewn beam that would lay atop them and be anchored together with ¼” steel plates and 3/4'” bolts. Once these columns and beam were installed, (over 2,000 lbs of lumber in these 3 items alone); we installed the “ledger” board to the side of the building, using a hammer drill, we bored through the 8” concrete block wall, and installed 3/4” J-Bolts from the back side of the concrete wall (in the ceiling of the offices inside the building), through the ledger board (which is 3”x 8” rough hewn lumber), effectively anchoring the ledger to the building, and allowing us to begin installing the joists from the ledger to the beam (supported by the columns). Once all of the joists were installed and the construction of the framework was completed, all fasteners were tightened, the tongue and groove decking surface was installed to provide the rustic open feel beneath the awning. Now the electrical for the LED lighting was installed, through a conduit, bent to hide along the joist, through the concrete wall, where it was connected to the electrical system in the ceiling space above the offices. Once this was finished, the metal roofing was installed with all the custom fitted flashing and trim; and the awning was ready to be cleaned, prepped, and stained with Sikkens wood finish. This provides a protective coating that is absorbed into the wood, and will protect it from the elements for 3-4 years between applications. And that is how you prevent Mother Nature from closing your door.

P1100457 P1100459P1100462 P1100513P1100520 P1100525P1100804

Wednesday, January 8, 2014

Services Provided


  • General Contractor
  • Plumbing
  • Custom Cabinets and Woodworking
  • Decks and Patios
  • Home Remodels
  • Finish Basements